

Beat the drums - swap your classic to disc brakes
Classic cars are mad for the instant nostalgia and good-time vibes they elicit when rolling down the road. However, we have far more traffic on our roads today compared to 30, 40, 50 or 60 years ago, and the reality is the braking systems these old cars come with are really no good. So, the only sensible thing to do for any regularly driven classic is to upgrade the stoppers!

My 1964 Pontiac Bonneville is a giant monster of a machine. It represents nearly 6m (20ft) long and 2m (6.5ft) wide worth of American pride, but it came from DiGiulio Pontiac with manual drum brakes. This means 2250kg (5000lb) of land yacht relied on a single-pot master cylinder an no vacuum assistance!

The benefit of disc brakes is you have better stopping power over repeated applications of the brakes, like when driving down a steep hill or in a line of crawling traffic. I personally also believe that a vacuum-boosted disc brake set-up offers vastly improved pedal feel compared to drums.

Thankfully, the legends down at Hoppers Stoppers in Victoria have been building brake upgrade kits from before the Electro Space Wizard had a beard, and they have a kit for my car.
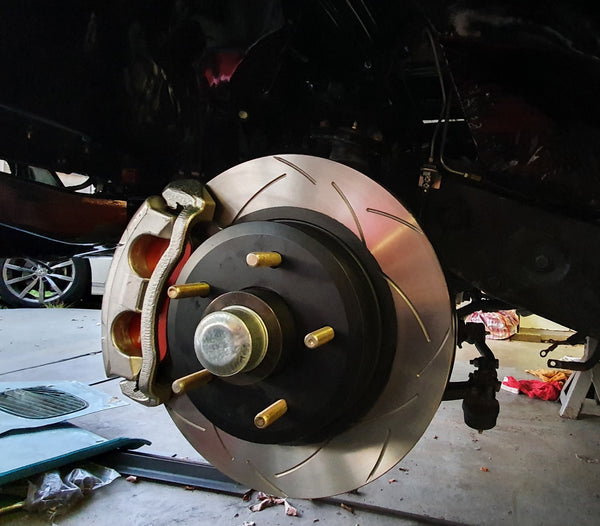
They're also the only Australian shop making disc brake kits for 1961-64 full-size Pontiacs (Bonneville, Star Chief, Grand Prix and Catalina), otherwise known as B-Body models. Be warned B-Body Chevys use different suspension and their parts don't fit. The Hoppers kit comes with all new two-pot aluminium calipers, discs, hubs, wheel bearings, brake lines, brackets, and more modern hubs.

The big Pontiac models also use a 5x127mm (5x5) PCD, which made finding wheels more of a chore. Because I wanted parts I could easily source I opted to go with a more conventional 5x120.65mm (5x4.75) PCD as used on many Chevies and classic Holdens, though if I had my time again I'd probably go for the 5x114.3 (5x4.5) used on Fords, Nissans, some Chryslers, and heaps of other cars, just so I had even easier access to different wheels.
The starting point for this swap was to rip the old drum brakes off the stock spindles, drop the steering link and clean the whole shebang up (thank you WD-40 brake clean!).
The stock stub axle is retained with this kit, and it is important to check it for damage or excess wear from driving on really hammered wheel bearings.

Hoppers supplies really clear instructions with their kits and it does pay to have them to hand as you go through all the bolts and brackets. I dry-fitted fitted everything to ensure it would all work properly, before pulling it all back out and installing it to the proper torque settings with Locktite on the fasteners.

Grease the wheel bearings using good quality hub grease. This job is messy so have some brake clean and fresh rags to hand, and wear good quality black nitrile gloves - you'll scoop the grease into the palm of your hand, then rub the bearing hard down on it to force the grease into the bearing's passages. You can buy a tool to do this, but if you're not doing multiple sets of bearings on different cars each year, the palm technique works just as well.

The benefit of the Hoppers kit over other set-ups is you get a far more modern design of hub and disc, compared to 1960s-80s disc brake set-ups like the one pictured below.
These older discs have their hub and bearings carried inside the disc rotor, while the Hoppers Stoppers later style of brakes use lighter components, with a rotor that slides over the hub, which also slides onto the spindle. One of these old-style rotors weighed as much as both hubs, discs and calipers from the Hoppers kit!

With the inner bearings greased they're fitted to the spindle, which is why it is vitally important you get that part surgically clean - you don't want any dirt getting into these bearings!

The hub is then slid over the top of the bearings, the end washer is fitted and the nut tightened until the hub still spins. This corner is now ready to accept the brake rotor!

Once the disc slides onto the hub, whack a wheel stud on to hold it steady to give you time to line up the two-piston aluminium caliper. These items were commonly fitted to large family sedans in Australia, and they're easily upgraded later on if I feel the car's performance outperforms them (remembering this isn't going to track days or be driven in anger like a muscle car).

With the bearing dust cap tapped in place, and new brake lines hooked up, the front is ready for bleeding.
I've switched the rear to a Wilwood disc brake kit, so the proportioning valve I had to split the front/rear brake bias had to be switched out for one suited to disc/disc set-ups. This comes down to drum brakes and disc brakes needing different amounts of line pressure to operate properly.
If you don't get this right your rear brakes will either lock too easily, or won't work at all.

Starting from around $1550(AU) for a kit using two-piston brake calipers and 290mm discs this kit is great value in my opinion. Hoppers Stoppers also have 330mm disc kits and a new range of four- and six-piston calipers.
All up it took me a little over an hour to knock this job out, with the kit clearly labelled and featuring all the hardware required to get the job done. Apart from cleaning the spindle and greasing the wheel bearings it is also pretty mess-free, which is a nice change on this car's build!